If you are just getting started with woodworking, a list of essential woodworking power tools might come handy. In this article, you will learn what are the most used power tools for woodworking projects, what are their main characteristics, and what are they used for. After reading this article, you will have sufficient knowledge to decide what tools you need for your projects and how to distribute your budget amongst them if you are building a woodworking workshop. You may also pick up some ideas on what you need to expand your pre-existent tool pool.
I consider the first 5 woodworking power tools presented below essential. You will need those for a lot of projects, so you need to prioritize them on your buying list. The other pieces of equipment are somewhat optional because they are only needed for certain particular projects.
Since this article is going to be quite articulate, consider using this table of content to jump to a certain tool description:
Table Saw

The first tool I want to talk about is the table saw. This is the most important and versatile tool you can get for your workshop. You can do rip cuts and crosscuts without worrying about the size of your board. A lot of beginners are hesitant about it since it seems kind of scary at first glance. But if you operate carefully, you are going to be fine. Just keep in mind a couple of tips: first, always plan your cut in advance to avoid awkward hands and body positioning. Second, do not stand directly behind the blade of the saw while cutting to avoid being hit if kickback occurs. Kickback happens when the wood doesn’t run straight through the blade, so when it reaches the rear of the blade it binds, and the teeth throw the piece forward.
So when getting a table saw, make sure you can install a riving knife, which is a piece of metal to put in line with the blade to cover its rear and prevent kickback. When it comes to table saw blades, I suggest getting a general-purpose blade. There’s no need to get a fine-tooth blade.
Circular Saw

This is a great tool for ripping sheet goods, or standard lumber as well (i.e. cutting along the grain). It can also be used for crosscutting (i.e cutting across the wood grain). You can even cut circles with the right jig. In addition to its versatility, I really like the portability of this tool: you can easily move the tool up your workpiece instead of having to drag the latter onto a stationary machine. This is especially true when working with large sheet goods, which are not easy to handle.
When buying a circular saw, there are a couple of features you need to look for. First, you want to be able to set the cutting depth of your blade: that way you can make woodworking joints like dados and half-lap joints. The second thing you want to look for is the possibility to set a certain bevel angle: that way you can cut angled edges. This is particularly useful to freshen up the look of your furniture pieces.
Another point to consider is the accessories that you might wanna get to make the most out of your circular saw. One that might come very useful is a straight line cutting jig. You can buy one or make yourself one; either way, it will allow you to cut things like sheet goods in a very straight and accurate way. This will come handy especially when you are going to assembly your project.
The second recommendation for you is to pick up a blade that is appropriate for the type of material you will work with. The stock blade that comes with a lot of circular saws is probably going to be a construction-oriented blade. If you are working with plywood or some kind of laminate, that blade is going to tear out the veneer of your material. To avoid that, I suggest you get a specific blade that is going to reduce the tear-out. You should look for a higher tooth count blade.
Jigsaw

You could describe a jigsaw like a handheld bandsaw. This woodworking power tool is going to allow you to cut non-straight lines easily. It’s a very versatile tool since you can use it to get into tight spots that you can’t reach with a circular saw. That is because the jigsaw is more compact, and the footprint is smaller.
When buying a jigsaw, a key thing to check is the base. The main issue here is to get the base to stay square when cutting, so you definitely need to check that the base of the machine is sturdy and solid when you lock it in.
A couple of other features you want to look for are oscillating modes that will help you get through the material a little bit faster. This is going to result in a rougher cut, so be careful with that. Another nice mode to have is the possibility of actively blowing the dust out of the way while cutting. With jigsaws, it is pretty common to have the dust building up where you are cutting, and that is going to make it hard to see the line. This mode comes handy for this reason.
Finally, if you are planning on working with plywood or laminate, you should consider getting a splinter guard to put in the base of your jigsaw. This will help to reduce veneer tear-out.
Talking about accessories, there isn’t a lot to say honestly. The only thing you need to make sure of is getting a good quality blade that works well with the material you are planning on cutting. You can get blades for all kinds of different materials. Other than that, jigsaws can be used successfully as they come out of the box.
Drill

This shouldn’t be a surprise for you. Drills are one of the most useful tools in woodworking. They allow you to drill holes, but they also come handy when doing joinery stuff, whether if it’s a basic butt joint, pocket holes, or dowel joinery. Drilling holes is probably a task that you are going to do on every project, so it’s a good idea to get a solid drill.
You could either get a corded or a cordless drill. The latter is usually more expensive, but the advantage of not having the power cord in the way all the time is worth the additional money. On the other hand, if you get a cordless drill, you are going to burn through batteries pretty quickly when doing big projects, where you are going to drill a lot of holes. So make sure to get big capacity batteries.
When buying a drill, a nice feature to have is variable speed, in order to adjust the speed based on the type of material you are drilling into. Variable speed also comes handy when driving screws, because it makes it easier to avoid stripping them out.
In addition to that, if you have a shop with concrete walls, you are inevitably going to want to hang something from those walls, so you will have to drill holes into them to put fasteners in. If that’s the case, I recommend you get a hammer drill. This type of drill comes with a mode that performs concussive blows, which allow you to drill into masonry a lot more easily. If you don’t have concrete walls, or you don’t plan on working with concrete, you will be fine with a normal drill.
Drill accessories
There are a lot of accessories you could get for your drill. For the sake of this article, I’m gonna mention only three possible choices.
- Countersink bit: as you could imagine, these bits are designed to make countersunk holes. This kind of holes makes your piece look a lot nicer and clean since they let the screw flush with the surface. Furthermore, they also help to reduce splitting. This is true especially for hardwoods, where it’s easy to crack the material when driving in a screw without a countersunk hole.
- Dowel jig: this jig makes the process of creating dowel joints a lot easier. They usually come with a drill bit with a depth stop.
- Pocket hole jig: same as before, this is going to help you create pocket holes without splintering the wood’s surface.
In general, it’s always a good idea to get a bunch of jigs for joinery: you are going to build projects that are a lot cleaner looking with no exposed screws, which are going to last a lot longer.
Impact Driver

After talking about drills, I think it’s necessary to take a look at the impact driver. In fact, I find it too be very useful when used together with a drill. The idea is to drill your holes with a drill, and then drive in your fasteners with an impact driver. This tool is going to save you a lot of time and effort, especially when dealing with long screws or hard materials.
Although, you need to be careful when using an impact driver: these tools are very powerful, so it’s easy to ruin your screws, especially if they are fragile (for example brass screws). I suggest you get a variable speed model, in order to prevent stripping your screws.
You may argue that you can do the same job with a drill. This is only partially true: impact drivers come with higher torque output, which comes handy with hardwood. Another thing is that it is really nice to have two separate tools for drilling holes and driving screws, so you don’t have to change bits all the time.
Related Articles: Impact Wrench vs Impact Driver
Router

This is another great addition to your woodworking power tools pool. You can do a lot of things with it, for example:
- routing dados and rabbets. If you don’t have a table saw, a router is going to be the only way to cut dados and rabbets with precision;
- adding decorating edge profiles to your piece of furniture;
- cutting mortises;
- routing templates.
When buying a router, the biggest decision to make is between a plunge or a fixed base router. I would recommend getting started with a plunge router since it’s more versatile. The ability to lower (i.e. “plunge”) the bit into the cut comes handy especially when creating joineries like mortise and tenon joints.
You could also decide to get a trim router, which is going to be a lot smaller and thus less powerful. It’s going to be a little easier to handle since it’s more compact. It is used mostly for rounding edges or adding chamfers, but it can also be used for joinery. Some of them also come with a plunge option and dust collection. A trim router is definitely a good place to start, especially if you don’t plan on routing a lot of heavy-duty thick hardwoods.
A key feature to look for is definitely dust collection. Routers generate a lot of dust and they can create an absolute mess, so find a router with at least a dust port.
Router Accessories
Talking about accessories, the main thing here is going to be bits. I would recommend getting single bits as you need them instead of getting a bit set. Over time you will build a much better quality selection than what you would get if you are buying a set.
Some of the starter bits you should buy are the following:
- For edge work, you need a roundover bit for round edges or a chamfer bit for chamfered edges. This really goes down to your personal taste;
- A flush trim bit for template routing or adding trim;
- A straight bit to cut joineries like dados and rabbets. You should get a ¾ inch bit and a ½ one for thinner material.
Another great accessory to add to your workshop is a router table. It is going to allow you to do more stuff with your router, and it makes the tool a little bit more controllable than a handheld router.
Random Orbit Sander

This is a tool you are going to spend a lot of time with if you work with wood frequently. So it’s a good idea to buy one that is at the top end of what you can afford. This will probably guarantee you fewer vibrations, which is the most important factor to consider about sanders.
The best way to do this is by trying a couple out and see which one vibrates the least in your hand. That is the one I would recommend buying. You are probably going to be sanding for hours, so the lower the vibrations the better. Another good feature that will prevent some fatigue is an auto-on switch. If you are sanding for a long time, you can set the trigger on and keep working without having to hold a button down all the time.
Another nice option to have is variable speed control, so you can adjust it based on the wood type you are working with. This comes handy especially with softwoods like pine, where it’s easy to sand away too much material if you are working with too high of a speed.
One more thing you must have is a dust bag or some sort of dust removal. Sanding generates a lot of fine dust which is going to be pretty bad for your health and also for your project. That’s because the dust is going to be embedded in the grain. If you don’t remove it and sand on it, the grain will come out with a muddy look.
When it comes to accessories, I would just recommend getting a variety of sanding pads with different grit sizes. 80 to 180 will be enough for most projects to get a nice and smooth finish. One thing I learned over the years is to change the sanding pad frequently. Once it stops feeling as rough and the surface starts looking clogged up, it’s time to change it. Don’t wait until it’s dead, because you are just going to waste your time.
Compound Miter Saw
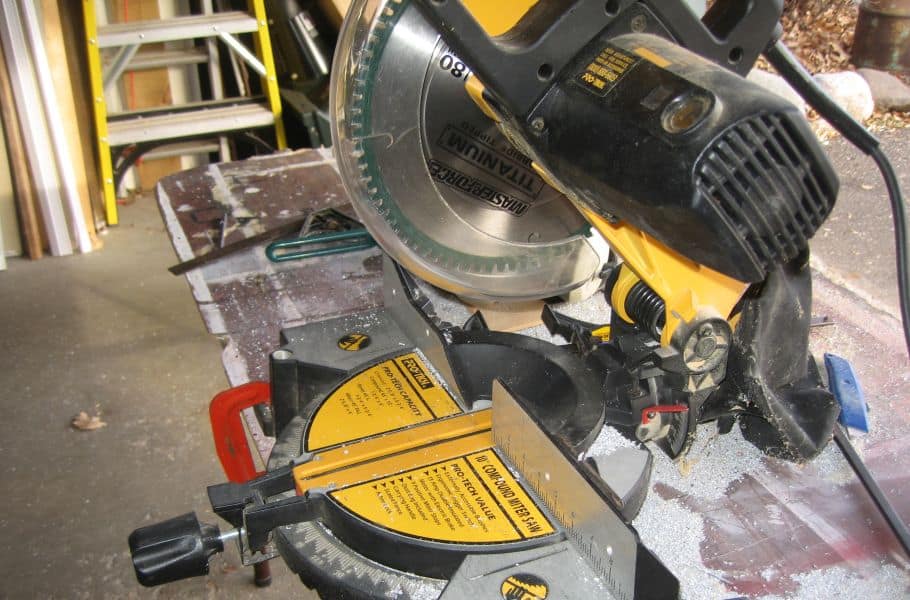
With this power tool, you can create repeated cuts all of the same length as well as accurate miters. Unlike a table saw, when using a miter saw your board remains stationary while the blade moves through it. Therefore the length of your cut is limited to the diameter of the blade: this is the reason why a miter saw is primarily used for cross-cutting. You can also get accurate angles by using the miter adjustment placed in front of the tool. You can create angles up to 45 degrees. If you get a compound miter saw, you can also tilt the head to create bevels.
When getting a miter saw, make sure that it comes with a blade guard to protect your hands from injury. Blade guards usually retract automatically when cutting. Another thing is to check for the presence of some form of dust removal. Usually, there’s a bag or a vacuum attached behind the tool. When it comes to sizes, you can choose between 7 ½, 10 or 12-inch versions. I suggest you get a 10-inch model since you can get most of the jobs you would do with a 12-inch model done at a cheaper price (12-inch blades are pretty expensive).
Planer
The job of a planer is to give boards a consistent thickness throughout their extension. That’s the reason why they are also called thickness planer. Since they do this by removing material, they also give a smooth surface to the board.

The planer will compress the board and give it a certain thickness, but when the board is released, the warp is gonna come out again if there’s any. This happens because of the planer’s design. It has feed rollers that press the board down on the working table. So if the board has any curvature, the planer will follow it during its job.
You can remove cups if you take light passes and the material is thick. If the material flexes a lot, it is hard for the planer to do its job because of what we discussed before.
Jointer
A jointer is a very simple piece of equipment which as only one kind of job: making boards perfectly flat by removing any kind of twist (let it be a bow or a cup). The common question that arises here is the following: I already have a planer, why should I get a jointer? (or vice versa). They are similar tools, but they do a different job. If you want your board to have two flat sides but not a consistent thickness, run both sides on a jointer. If you want a consistently thick board that is also flat, run the board in the jointer first, and then into the planer.

In case you don’t have the money for a jointer and a planer, there are a lot of ways to get their job done without them. Just look up on YouTube or Google and you’ll find a lot of examples.
Drill Press
As you might imagine, a drill press is a tool for making holes. Consider getting this in addition to a common drill if you want to make straight holes consistently, or you need to set the spacing or the depth of your holes. You can also get different attachments, for example a drum sander attachment for sanding purposes.

You can either get a floor standing drill press or a benchtop drill press. The latter is probably the best place to start with since you are going to be able to get most of the jobs done with it, and it is less expensive.
A nice accessory to get is a drill press table. First of all, it enlarges your working surface, so it’s easy to position larger pieces. Secondly, the fence comes really handy. For example, it allows you to get consistently spaced holes with ease. It also improves your safety, since it acts as a stop for your board, preventing it from spinning.
There’s really no comparison with a handheld drill. You get a lot more power, accuracy, and repeatability.
Band Saw

A bandsaw is a great tool for cutting curves and circles, making rounded corners, cutting notches, etc.. You could argue that you can do the same thing with a jigsaw. The thing is that a bandsaw gives you more control and it’s less messy since it goes in a downward motion, pulling the dust under the table. So it’s easier to follow a certain line without the dust covering the cut line.
The other thing in favor of bandsaws is work capacity. You can stack boards on top of each other and process them all together, saving a lot of time. You also get consistent results across all the boards this way. With a jigsaw, you would have to cut one board at a time due to the length of the blade. I mean, there are a lot of good points in favor of jigsaw (the price for example). The choice is up to you, in an ideal world with infinite money you would get both of them.
Another thing you can do with a band saw is resawing lumber. You can split it apart easily with the help of a tall fence. This comes particularly handy when you have thick lumber that you wouldn’t be able to use for anything.
Scroll Saw

Another type of saw you can get is a scroll saw. It has a reciprocating blade that goes through the working table, which makes it similar to a sawing machine. It is mainly used for specialty work like intarsia, detailing, fretwork, etc. This is the perfect saw to perform intricate cuts. You can make curved cuts up to 90° degrees and circular cuts. You can also perform inside cuts since you can easily lift the blade and make it pass through your working piece. The surface of the cut is always clean since the blade is small. So if you are planning on working on small pieces of wood to do any of the previously mentioned activities, this is the right tool to get. If that’s not the case, you can probably skip this one and save some money.
For a more detailed comparison between this tool and the band saw, check out this article.
Biscuit Joiner

If you want to join two pieces of wood and you need the joinery to be totally hidden, there aren’t a lot of possibilities. You can go for box joints or dovetails. Another good option is to use a biscuit joiner. Basically, this tool makes slots in your wood pieces where the biscuits are inserted. Then the glue makes the biscuits expand and fill the slot, creating a tight joint that also reinforces the connection between the two pieces. This is especially true when joining end grain to face grain. Putting in some biscuits elevates the joinery strength a little bit.
A biscuit joiner can cut slots of all different measures that accommodate all biscuits’ sizes. There are 20s, 10s, zeros, and FFs. To help you choose the correct size, check this quick guide I wrote here. In short, you should use the biggest biscuit size you can fit (this is especially true if you are looking for strength in your joint).
If you manage yourself well with joinery stuff, and you don’t care about having visible joints, then you can probably skip this one. On the other hand, if you are a beginner, I think that a biscuit joiner is a valid alternative to churn out joints easily.
Radial-Arm Saw
A radial arm saw is also a nice addition you can make to your workshop. Their main feature is the overhead arm that has the motor and blade mounted on it. The tilting head lets you perform rip cuts, crosscuts, and you can also use it for joinery stuff like dadoes and rabbets. You can also make miters and bevels. There’s a lot you can do with it, but the question is, do I really need it if I already have a bunch of other saws? The answer is: it depends. There are multiple things to consider: first, radial-arm saws are expensive tools. Second, they are heavy and bulky, so they take up a lot of space and they are hard to move. Last, they are more difficult to set up than other tools. In my opinion, there are two choices you can make: get one of these, or get a table saw for rip cuts and a compound miter saw for crosscuts.
Other than that, these are certainly very powerful and precise tools, like most stationary tools are.
Sabre Saw

These are also called reciprocating saws since the blade moves back and forth. This isn’t exclusively a woodworking tool: you can use it for a lot of other stuff, like cutting metal and PVC pipes and tree branches. It’s commonly used as a demolition tool: you can perform plunge cuts, for instance. You can also cut studs with ease since you don’t have to worry about removing nails first. A sabre saw is going to cut through them without problems.
Reciprocating saws usually come with variable speed. That is great especially when cutting metal, where you want to go very slow. It’s also a great idea to use an appropriate blade for metal, with a higher number of teeth.
It’s a versatile tool to have if you like dabbling in other things rather than just woodworking. Don’t use it if you are looking for a clean cut. The results you get with sabre saws are usually pretty rough.
Bench Grinder

This isn’t a woodworking power tool, but you need it in your workshop to sharpen your cutting tools, such as tool bits, drill bits, chisels, and more. If you want to learn how to sharpen your chisel the proper way, I wrote a dedicated article. A bench grinder is not a mandatory purchase since there are other ways to sharpen your tools, but it’s a nice addition to have. This is especially true if you also find yourself working with metal from time to time. You can install a wire brush wheel instead of a common wheel, and use it to clean rust or remove paint. You could also put on a buffing wheel for polishing purposes.
A couple of tips when it comes to usage: always align the tool rest properly, 1/16 of an inch from the wheel is ideal. Adjust the spark guard also, if present. Put safety first: wear glasses and ear protection. To get more out of your bench grinder, remember to dress the wheel properly when needed.


